Learning to tie reliable knots is one of the most fundamental skills in carp fishing, yet it is one that many beginners overlook or rush through. A poorly tied knot is a weak link in your setup, and it only takes one failure to lose the fish of a lifetime. The good news is that you do not need to learn dozens of complicated knots to be an effective carp angler. A handful of well-practised knots will cover virtually every situation you encounter on the bank.
In this guide, I am going to walk you through the essential knots that every carp angler should know. I will explain when to use each knot, how to tie it properly, and the common mistakes that lead to knot failures. Take the time to practise these at home before your next session, and you will have the confidence that your setup is as strong as it can be from rod tip to hook point.
Why Knot Strength Matters
Every knot you tie introduces a weak point in your line. Even the strongest knots reduce the breaking strain of your line by a certain percentage, and a poorly tied knot can reduce it dramatically. The goal is to choose knots that retain as much of the line’s original strength as possible and to tie them consistently well every time.
The two most common reasons for knot failure are insufficient turns in the knot and failing to lubricate the knot before tightening. When you tighten a knot without wetting it first, the friction generates heat that can damage the line, creating a weak spot right at the knot. This is especially true with monofilament and fluorocarbon lines. Always wet your knots with saliva or water before pulling them tight, and always test them with a firm pull before you cast out. It is far better to discover a weak knot at your feet than to find out about it when a big carp is heading for the snags.
The Grinner Knot (Uni Knot)
The grinner knot, also known as the uni knot, is arguably the most versatile and widely used knot in carp fishing. It can be used for tying line to swivels, hooks, and other terminal tackle, and it is one of the strongest and most reliable knots available. If you only learn one knot, make it this one.
When to Use It
The grinner knot is used for attaching your main line to a swivel, for tying your line to a lead clip, or for connecting your hooklink to a hook when tying rigs. It is an incredibly versatile knot that works well with monofilament, fluorocarbon, and even braid, although the number of turns you use may vary depending on the line type.
How to Tie It
Thread the line through the eye of the swivel or hook. Pull through about fifteen centimetres of line to give yourself enough to work with. Turn the tag end back towards the eye to form a loop alongside the standing line. You should now have a loop with both the tag end and the standing line running parallel.
Take the tag end and wrap it around both the standing line and the loop. For monofilament and fluorocarbon, make five turns. For braid, make seven or eight turns because the smoother surface of braid can cause the knot to slip with fewer turns.
Once you have completed the turns, pass the tag end through the loop. Wet the knot thoroughly, then pull the tag end to tighten the wraps. Finally, slide the knot down towards the eye by pulling the standing line while holding the tag end. The knot should seat neatly against the eye with all the wraps sitting evenly.
Trim the tag end close to the knot, leaving a millimetre or two of tag. Do not cut it flush as the knot may slip under extreme pressure if there is no tag left.
Common Mistakes
The most common mistake with the grinner knot is not using enough turns. Four turns may hold under light pressure, but five is the minimum for security with mono. Another mistake is tightening the knot too quickly without lubrication, which causes the line to burn and weaken. Take your time, wet the knot, and pull it tight in a smooth, steady motion.
The Knotless Knot
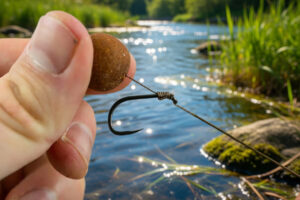
The knotless knot is the foundation of hair rig construction and is one of the most important knots in modern carp fishing. Despite its name, it is technically a knot, and a very effective one at that. It creates a neat, strong connection between the hooklink and the hook while simultaneously forming the hair on which your bait sits.
When to Use It
You use the knotless knot whenever you are tying a hair rig, which is the most commonly used rig in carp fishing. The beauty of this knot is that it serves a dual purpose: it secures the hook to the hooklink and it creates the hair extension in one simple tying process.
How to Tie It
Start by tying a small loop at the end of your hooklink material. This loop is what your bait will be threaded onto using a baiting needle and secured with a hair stop. The loop should be just big enough to pass over your chosen bait.
Thread the other end of the hooklink through the back of the hook eye, from the point side to the shank side. Pull enough material through so that the loop hangs at the correct distance below the hook bend. For a standard bottom bait presentation, the loop should hang roughly level with the point of the hook.
Now, holding the loop in position, start wrapping the hooklink around the shank of the hook and the hair, working from the eye downwards towards the bend. Make between six and eight even turns, keeping each wrap tight against the previous one. The wraps should be neat and parallel, not overlapping or crossing.
Once you have completed the wraps, thread the tag end back through the eye of the hook from the shank side to the point side. Pull the hooklink through and test the knot by pulling on the hooklink while holding the hook. The knot should grip the shank firmly without slipping.
Getting the Hair Length Right
The length of the hair, which is the distance between the bottom of the hook bend and the bait, is important for hooking efficiency. Too short and the bait may mask the hook point, preventing clean hook-ups. Too long and the hair can tangle around the hook or reduce hooking efficiency.
As a starting point, set the hair so that there is roughly the width of your bait between the bottom of the hook bend and the top of the bait. So if you are using a fifteen-millimetre boilie, there should be roughly fifteen millimetres between the hook bend and the boilie. You can adjust this based on your results, but this is a reliable starting point that works in most situations.
The Palomar Knot
The palomar knot is one of the strongest knots available and is particularly useful for attaching swivels, clips, and other terminal tackle to your line. It retains close to one hundred percent of the line’s original breaking strain when tied correctly, making it one of the most reliable connections you can use.
When to Use It
The palomar knot is ideal for attaching your hooklink to a quick-change swivel, for connecting a lead clip to your main line, or for any situation where you need a bombproof connection to a piece of terminal tackle. It works well with all line types, including braid.
How to Tie It
Double the end of your line to create a loop of about ten centimetres. Pass this doubled line through the eye of the swivel or clip. Tie a simple overhand knot with the doubled line, but do not tighten it yet. You should have a loop hanging below the overhand knot.
Pass the loop over the swivel or clip, then pull the loop back above the knot so that the swivel sits in the gap between the loop and the overhand knot. Wet the knot, then pull both the standing line and the tag end simultaneously to tighten the knot. The knot should seat neatly against the eye of the swivel.
The key to this knot is making sure the loop passes completely over the attachment before you tighten it. If the loop catches on the swivel, the knot will not form correctly and will be significantly weaker.
The Blood Knot
The blood knot is used for joining two lengths of line together, which is useful when you need to attach a leader to your main line or when you need to extend your line with additional material.
When to Use It
You would use a blood knot when attaching a fluorocarbon or monofilament leader to your main line, or when you need to join two lines of similar diameter. It is a symmetrical knot that distributes the load evenly between both lines, making it a reliable choice for line-to-line connections.
How to Tie It
Overlap the two ends of line by about fifteen centimetres. Take one tag end and wrap it around the other line five times, then bring the tag end back and pass it through the gap between the two lines at the point where the wraps began.
Now take the other tag end and wrap it around the first line five times in the opposite direction. Pass this tag end through the same gap but from the opposite direction. You should now have both tag ends emerging from the centre of the knot in opposite directions.
Wet the knot thoroughly, then pull both standing lines in opposite directions to tighten the knot. The wraps should tighten down neatly and the knot should pull into a compact barrel shape. Trim both tag ends close to the knot.
The Figure-of-Eight Loop Knot
The figure-of-eight loop knot creates a small, strong loop at the end of your hooklink, which is used for attaching the hooklink to a quick-change swivel or for creating the hair loop in a hair rig.
How to Tie It
Double the end of your line to create a loop. Tie a figure-of-eight knot by passing the loop over the standing line, then under, then through the gap created by the first turn. Wet and tighten the knot. The result is a small, neat loop that will not slip under load.
This is one of the simplest knots in carp fishing, but it is used constantly. Practise it until you can tie it quickly and consistently, because you will be tying a lot of them over the course of your fishing career.
Tips for Tying Better Knots
Beyond learning the knots themselves, there are some general principles that will help you tie more reliable knots every time.
Always wet your knots before tightening them. This is the single most important thing you can do to preserve knot strength. The lubrication prevents friction damage to the line and allows the wraps to seat properly against each other.
Always test your knots after tying them. Give each knot a firm pull to check that it is seated correctly and is not going to slip under load. It is far better to retie a knot at your peg than to discover it was weak when a fish is on the other end.
Practise at home before you go fishing. Tying knots on the bank, especially in cold weather with numb fingers, is much harder than tying them in the comfort of your living room. The more you practise, the more automatic the tying process becomes, and the more consistent your knots will be.
Use the right number of turns for your line type. Monofilament and fluorocarbon generally need five turns for a secure grinner knot, while braid needs seven or eight because of its smoother surface. Using too few turns risks the knot slipping under load.
Do not cut your tag ends too close to the knot. Leave a millimetre or two of tag as insurance against slippage. This tiny amount of extra material does not affect your rig presentation but can prevent a knot failure under extreme pressure.
Final Thoughts
Knot tying is one of those skills that separates consistent anglers from those who suffer regular tackle failures and lost fish. The knots I have covered in this guide will handle every situation you encounter in carp fishing, from attaching your reel line to a swivel right through to building complex rigs. Master these knots, practise them regularly, and always test them before you cast out. Your confidence on the bank will grow enormously when you know that every connection in your setup is as strong as it can possibly be.
Last Updated on March 11, 2026 by Shane
I have made a lot of mistakes during my fishing sessions and don't want you to make the same mistakes. I've learned the hard way over 20 years of fishing most weekends, testing, tweaking, and testing again and now want to help you excel with your carp fishing.
If you need any help, you can reach me at Fishing Again's Facebook page