Set Up Your Tackle Correctly
To map out your swim accurately you need the right tackle, else all of your hard work will be in vain and you will be wasting valuable time.
The majority of mistakes and inaccuracy when investigating what is in the lake in front of your swim comes down to one major component within your tackle, your choice of main line.
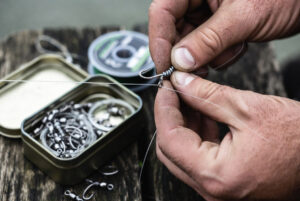
Braided Main Line
If you are not using a braided main line, you will have stretch introducing errors and causing mistakes when you are mapping out your swim.
Most of the errors will occur when you are dragging your lead back through the water to feel what the lake bed is made up of, if you are using monofilament, you will not feel all of the knocks as accurately as you would with braid.
You will also lose the feeling of the lead hitting the bottom of the lake bed, indicating what type of ground you have landed on, which is the most important aspect of using a marker float.
My favorite braid to use is ESP Spod and Marker braid in 20lb, this is because it is a very supple braid and has a thin diameter, making it really nice to cast at range.
Strong Marker Rods
You should also have a stiff rod as your marker rod to help you feel the vibrations through the rod tip.
I use a 3.5lb test curve carp rod by NASH. I try not to go less than 3lb test curve and try to use fast action tipped rods.
I also use a FOX 12000 big pit reel so I have lots of control over reeling in. Using a bit pit reel also means fewer turns when reeling back in, making it easier to count the turns, and easier to get the rig back in quicker.
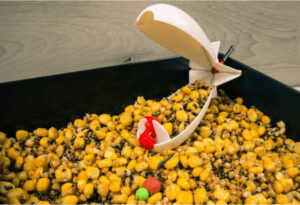
Ill then attach a quick clip so that I can take the marker float off really quickly and attach the FishSpy to confirm what I think I am feeling at the bottom of the lake. I can then also use this with the spod if I want to put some bait out.
I have an article here that talks you through how to use a FishSpy.
I also explain here how to use a marker float and spod rod.
Start with a Distance Lead
Distance leads shouldn’t be used for feature finding due to the shape, but they are great to get a very quick idea as to what is in front of you in terms of what is on the lake bed.
If I’m working at range, I’ll use a 4oz lead, but up to 50 yards, I’d use a 3oz lead just to get a feel as to what is out there.
I’ll clip the lead onto the quick clip I mentioned earlier and have a cast towards a few bank markers on the other side of the lake. Ill use telegraph poles, centers of bushes and tree trunks as bank markers. I’ll cast as far as I want to fish and feel the lead down, counting between it hitting the water and it resting on the lake bed. This will give me an idea of depth.
I will also take note as to how hard the lake bed is at that location, this is where the distance lead is useful because the shape of the lead will emphasize the hardness through the braid and down your rod.
A hard landing and a big shudder down the rod tip will typically indicate gravel. A semi-hard landing will indicate silt, light weed or sand. And a soft landing would indicate dense weed.
The beauty of using a distance lead for feeling around is not being locked up with weed if you find any, whereas you would be dragging weed back in if you were using a gripper lead or a breakaway lead.
The whole idea of using the distance lead is to get a quick idea of the depth and the makeup of the lake bed.
Survey the Area Around Hard Spots
Confirm the Landing
When you feel a solid landing, clip the line up on your line clip take a note of your far bank marker, reel the rod in, then cast back out to the same spot, making sure you hit the clip and confirm that the hard spot is where you think it is.
If you feel it again when the lead lands on the lake bed, cast out a couple of more times to be sure and then reel it back in.
Once you are confident, you will need to take off the distance lead and put the gripper lead, grubber lead or the breakaway lead on the quick clip.
A breakaway lead has the added benefit of picking up weed with the prongs so you can see what type of weed it is. If there are lots of crustaceans in the weed, it might be worth putting a chod rig on top of it as the fish are bound to grub around it the weed eating the insects and critters amongst it.
Check the Surrounding Area
Cast back out to the spot and make sure you feel the donk. When you do, drop the rod tip to the side and pull it away from the lake slowly to feel if there are any nasty surprises such as thick weed or snags.
Pull the tip away from the lake slowly, by 4-6 feet and feel the vibrations down the line, to your hands.
It’s likely you will feel lots of little vibrations or no vibrations at all.
If there are no vibrations, you have found sand or silt, small vibrations will be gravel, and if the rod tip locks up or gets heavy you have a weed bed in front of your hard spot.
If the area is clear, note down the spot in your fishing diary, also note down the number of winds around your distance sticks, take your clip off and start looking for your next spot.
If There is Weed Present
If you bring weed back in, you have a choice to make. You can fish the spot, keeping in mind how the rig will sit if there is a weed bed in front of it lifting the line up off of the lake bed. Or, you can note the spot down, not put a rig on it, but bait it up with a spod and watch for signs of feeding on that spot throughout your fishing session. You might find that the hard spot is an area amongst the weed that has been created by fish feeding.
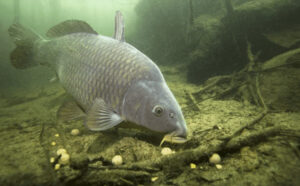
Always make sure you use the FishSpy to confirm your findings, by casting out to the spot and filming what is on the lake bed.
The whole idea of the above is confirming if the hard spot you found is actually clear and hasn’t got layers of weed over it, or thick weed around it.
Start off with a distance lead to find the hard spot, then use the other leads to confirm the spot is clear.
Rinse and Repeat
Keep looking around until you find a decent amount of potential fishing spots.
The hardest spots are usually present on day ticket waters because these are the areas fish tend to feed off of consistently, and it is the fish that have completely cleaned the area from previous meals. Keep looking for those spots because the more you find, the better idea you will have in your mind as to how the lake bed looks and this will give you more choices when you fish these lakes.
You will be able to bait up these spots, wait for signs of feeding and then send a rig out to try and snare the fish. If your spot goes quiet, you can then try a new spot and see if that spot starts producing fish.
Getting as many options as you can is the key.
Be tactful as well whilst you are on the bank, by watching the other anglers.
There is a high chance that they have also had a good feel around the lake with a marker float, so try and take note as to where they are casting to and whether their spots are producing any fish.
If they are catching fish from that spot, make a note of the spot in your fishing diary and when the angler leaves, or the next time you are at the lake, have a feel around the spot with your marker float to see if it has potential.
Final Tips
You will get to a point in your angling where you won’t need to use a marker float, typically marker floats are used to give you an idea of depth, but you will find that a distance lead will be able to give you an estimate by counting as it falls through the water, once that is done, make a not in your diary and the next time to fish the lake, you can have a quick cast around just to check if anything has changed such as, new weed beds.
Don’t use a gripper, grubber or breakaway lead until you have had a feel around with a distance lead, if you do, you will more than likely just end up pulling mounds of weed in and ruin the swim in front of you by disturbing the bottom of the lake.
Use distance sticks to accurately record the distance, either take a photo of where you are standing and take a photo of the far bank distance marker, or make a good note in your fishing diary. An even better method is to print off an aerial photo at home and mark it up on the bank, noting where fish are getting caught and where you can see signs of fish.
Watch the other anglers on the lake, make a note of what they are catching and where they are fishing, so the next time you are in their swim, you shorten the time it takes to find potential spots to fish.
Take a note of the time of the year and the weather, so you can look through your diaries to see if there are any patterns. You may find that the fish are at a certain end of the lake when it is hot, or at other ends of the lake when the wind is up. This will give you an idea of where to start looking for them when you get to the lake.
Confirm everything you find with the FishSpy and the Deeper Pro sonar, compare the results to give yourself the most accurate readings possible. The Deeper Pro now has the ability to map out the lake from the bank side and will give you a rough indication as to the depths and whether there are any pits, holes or gravel bars, again, giving you an indication as to where to start looking for the fish.
Last Updated on June 11, 2026 by Shane
I have made a lot of mistakes during my fishing sessions and don't want you to make the same mistakes. I've learned the hard way over 20 years of fishing most weekends, testing, tweaking, and testing again and now want to help you excel with your carp fishing.
If you need any help, you can reach me at Fishing Again's Facebook page